More FAQs
When getting started with eLAB it is important to understand what it is mainly meant to do, which is to create a patient personal dentin recipe based on the L*a*b* system instead of relying on a combination of visual shade assessment together with an unreliable shade guide system for which there is no industry uniform standard.
In other words, what you should do when getting started with eLAB is to follow the patient personal mixing recipe that eLAB_prime generates, instead of opening a bottle that says "A2" on it. You should keep everything else the same, including your layering style. You will get the best out of the eLAB system if you combine it with your skill, experience and intuition.
We frequently record and publish tutorials by experienced eLAB_instructors to help you to get started and you can find them here: Watch eLAB tutorials here!
We also run world-wide hands-on courses conducted by our team of eLAB_instructors to help you get started or to deepen your knowledge. For more information click here!
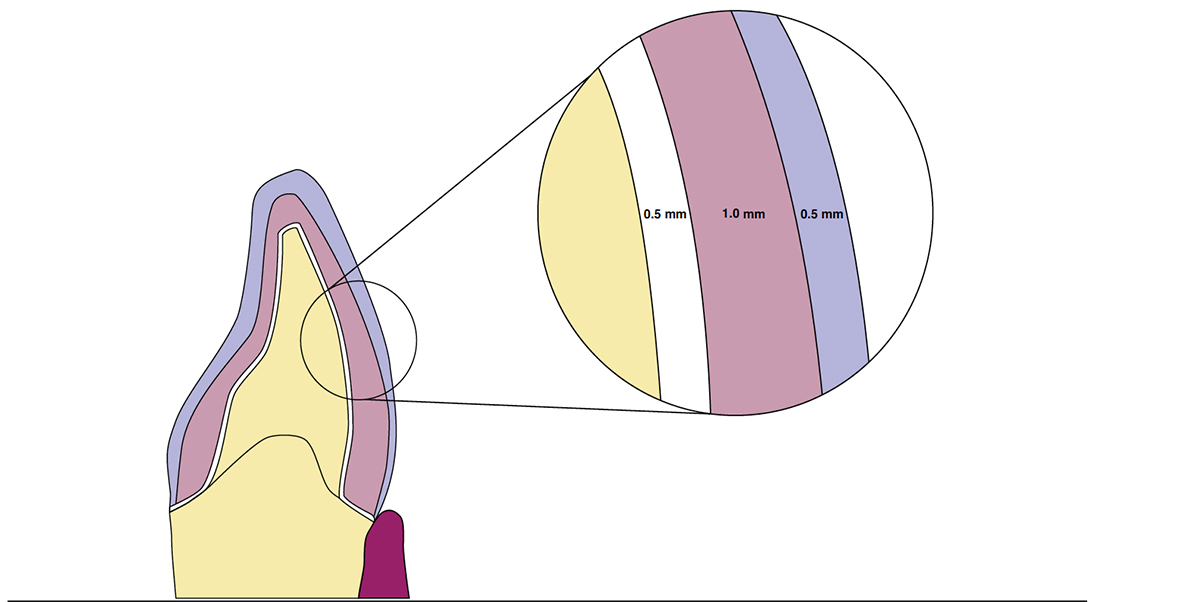
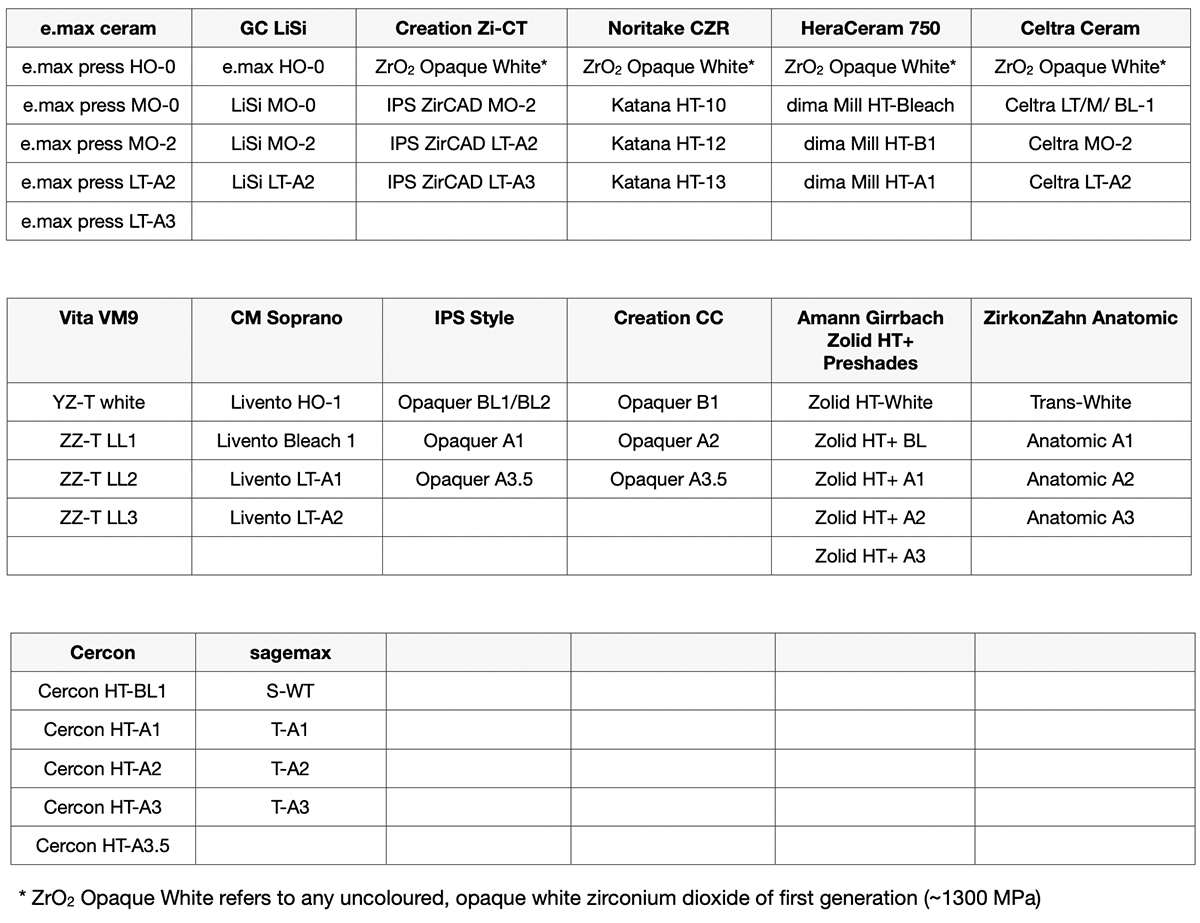
When using translucent frame work materials such as lithium disilicate or translucent zirconium dioxide it is necessary to measure your restoration on a simulation model which offers good approximation of the oral environment. Two aspects are known to matter the most:
- the presence of gingiva influences values a long the a*-axis (red)
- the substrate color can affect the overall luminosity (L*)
You can download the user's manual here.
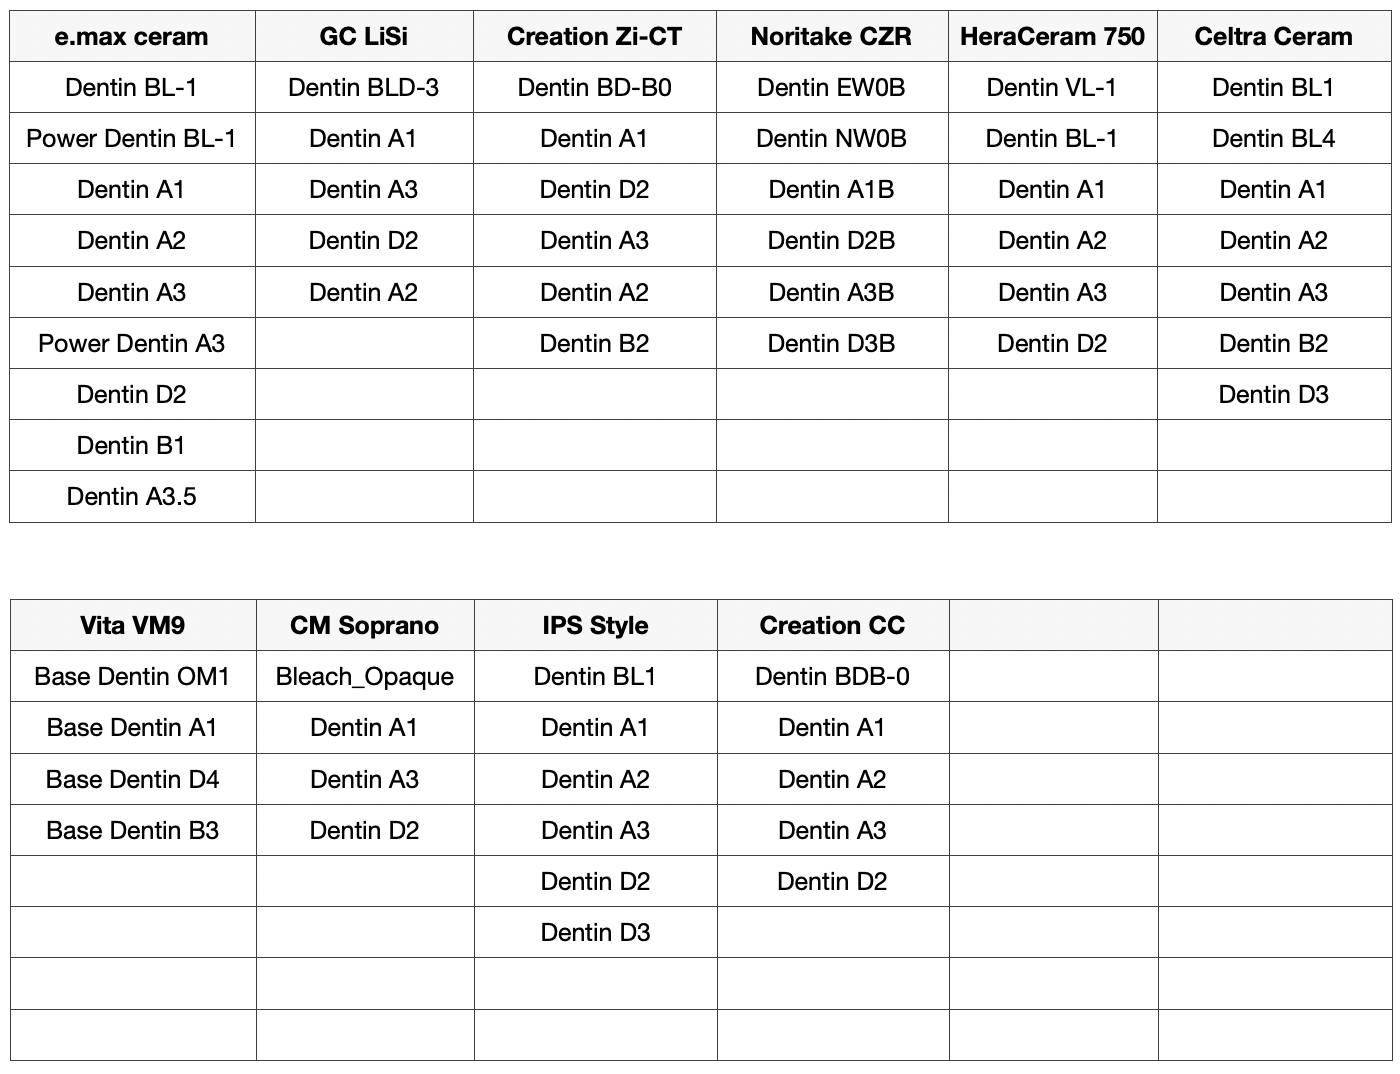
Because of the trichromatic subtractive color mixing method you only need very few dentin shades which helps to keep the ceramic stock low in times when more and more restorations are pressed/milled and stained. Depending on your preferred ceramic system these are the dentin shades you will need for eLAB (meaning you won't the others):
So your old beloved Mac or PC has had it. You can no longer update to the latest operating system and it has become as slow as hell. Time to buy a new one and claim it as a business expense - great decision! But how do I now switch my eLAB_prime licence key and what happens to all my photos?
No worries - We’ve got you covered!
You need to first log into your account in our web shop www.emulation.me
If you have forgotten your password click on “I forgot my password” and you will receive an email to reset your password. No need to get in touch with us because we don’t know your password.
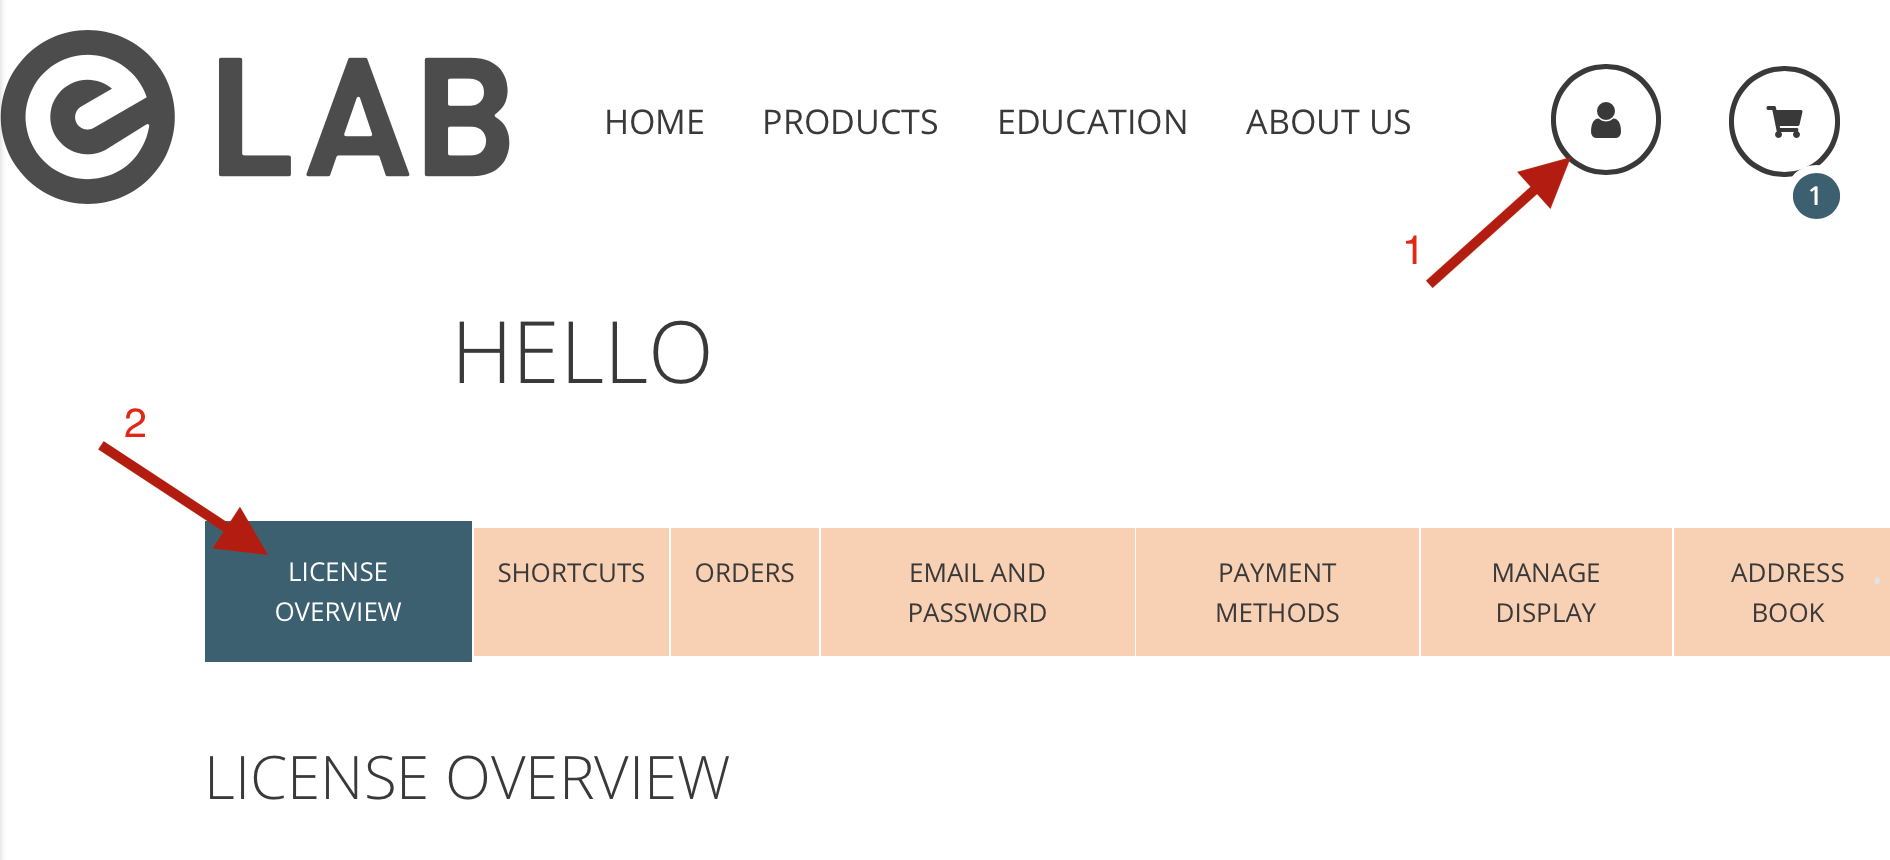
Once you have logged-in successfully click on “My Account” and then on "Licence Overview":
Here you will see your licence key and also which computer it is registered to:
Click on "remove" and now you are ready to download the lates version of eLAB_prime from:
https://www.downloademulation.me
Just follow the instructions to install eLAB_prime on your computer and enter/paste your licence key.
Your pictures are still stored on your old computer. You can access them by going to:
Mac: ~/Library/Application Support/elab/images/raw
Windows: %AppData%/elab/images/raw
Depending on how many images you have, you best transfer them to something like an external hard drive or you simply transfer them via iCloud or OneDrive. Once your images have uploaded (this may take some time) you can then drag and drop them into the same folders as above on your new computer after you have installed and activated the latest version of eLAB_prime.
"As the practitioner we only need to take that one picture right, correct?" - Theoretically "yes" but taking that one picture right is surprisingly harder for most practitioner than one might think.
The most common errors practitioners make when trying to take those pictures right for eLAB are:
1. Failure to turn off E-TTL and switch to the manual mode with maximum intensity (1:1) instead. Your polar_eyes filter will swallow light and your camera has no idea what you are trying to do. If you keep E-TTL switched on (i.e. convenience) you will end up with severely under-exposed images which may not be processed reliably by the eLAB_prime application.
2. Failure to acknowledge the detrimental effects of dehydration on tooth color. The shade images for your technician are best taken right before treatment when the teeth are still fully hydrated. They are not best taken in-between treatment phases, i.e. whilst waiting for the impression or scan to be taken. It is also important to take any shade images after the hygiene appointment or after any bleaching treatment was carried out.
3. Failure to shoot from close enough. Most practitioners have a tendency to take shade images from a much too far distance, resulting again in unsuitably dark, under-exposed images. In most cases, your ideal shooting distance from the lens to the labial surface of the teeth should be around 25 cm.
4. Failure to communicate the presence of asymptomatic or pathological stump/substrate shades when requesting an all-ceramic restorations like e.max. If the prepped tooth has a funky color, your technician needs to know about it, or else you will be in for an unpleasant surprise during try-in. You can play around with opaque cements, which often, is little more than a "cute idea". Once you have completed your preparation, it is always a good idea to take a quick picture of the stump shade regardless and by following the eLAB photographic protocol so your technicians knows what they are dealing with.
5. Failure to provide complete photographic documentation in case of shade complications. Making natural looking single central restorations presents a significant challenge any day of the week, let alone when this is attempted over the distance. Implementing the eLAB work flow with all its radical ideas may, at least initially, turn out to be a rough ride. Suppose the clinical outcome was not as suggested by the digital try-in, it is important to document this failure adequately by taking a picture of the seated and presumably miss-matching restoration in the mouth, not by quickly using your smart phone (again convenience), but by following the eLAB photographic protocol. This way we can adequately analyse what the cause of the complication was in order to ensure a better outcome next time.
We have thought really long and hard about the eLAB protocol and all its individual steps not for the pleasure of making our customers jump through hoops, but because each step is actually necessary and serves a particular purpose. Just because the sense of each step evades us at times doesn't imply that there is none to it. Just remember 😉
"If Your Pictures Aren’t Good Enough, You’re Not Close Enough"
Robert Capa (1913 - 1954). War photographer and founder of Magnum
This statement by the iconic Robert Capa pretty much says it all. Luckily, the strict application of this rule may have severely different meanings in the shallow waters of Omaha Beach in 1944 than in dental photography!
Nevertheless, ordinary examples of dental photography can be readily identified by three blatant and unfortunately common errors:
1. Too much distance from the lens to the labial surface of the teeth
2. Dark exposures due to too much distance and the combined use of polar_eyes with E-TTL
3. Unwillingness to use retractors
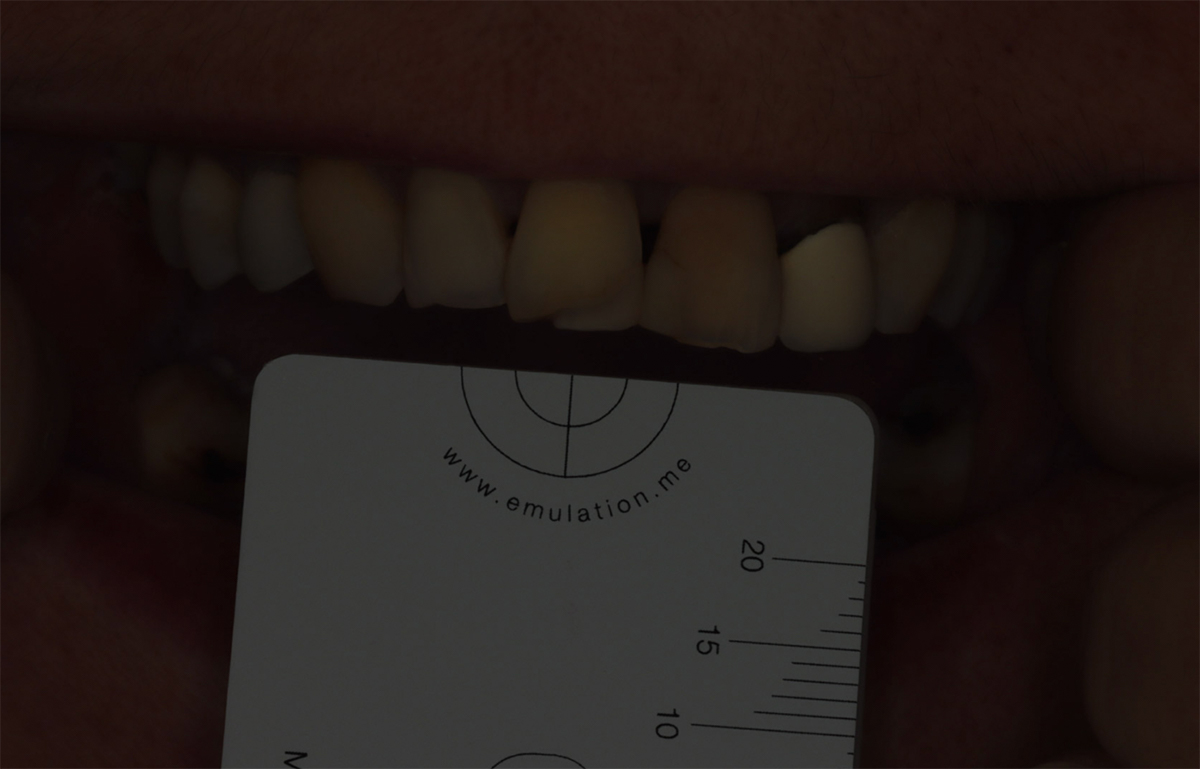
If the image above looks all too familiar then there is a video that you can watch here which shows how its done properly.
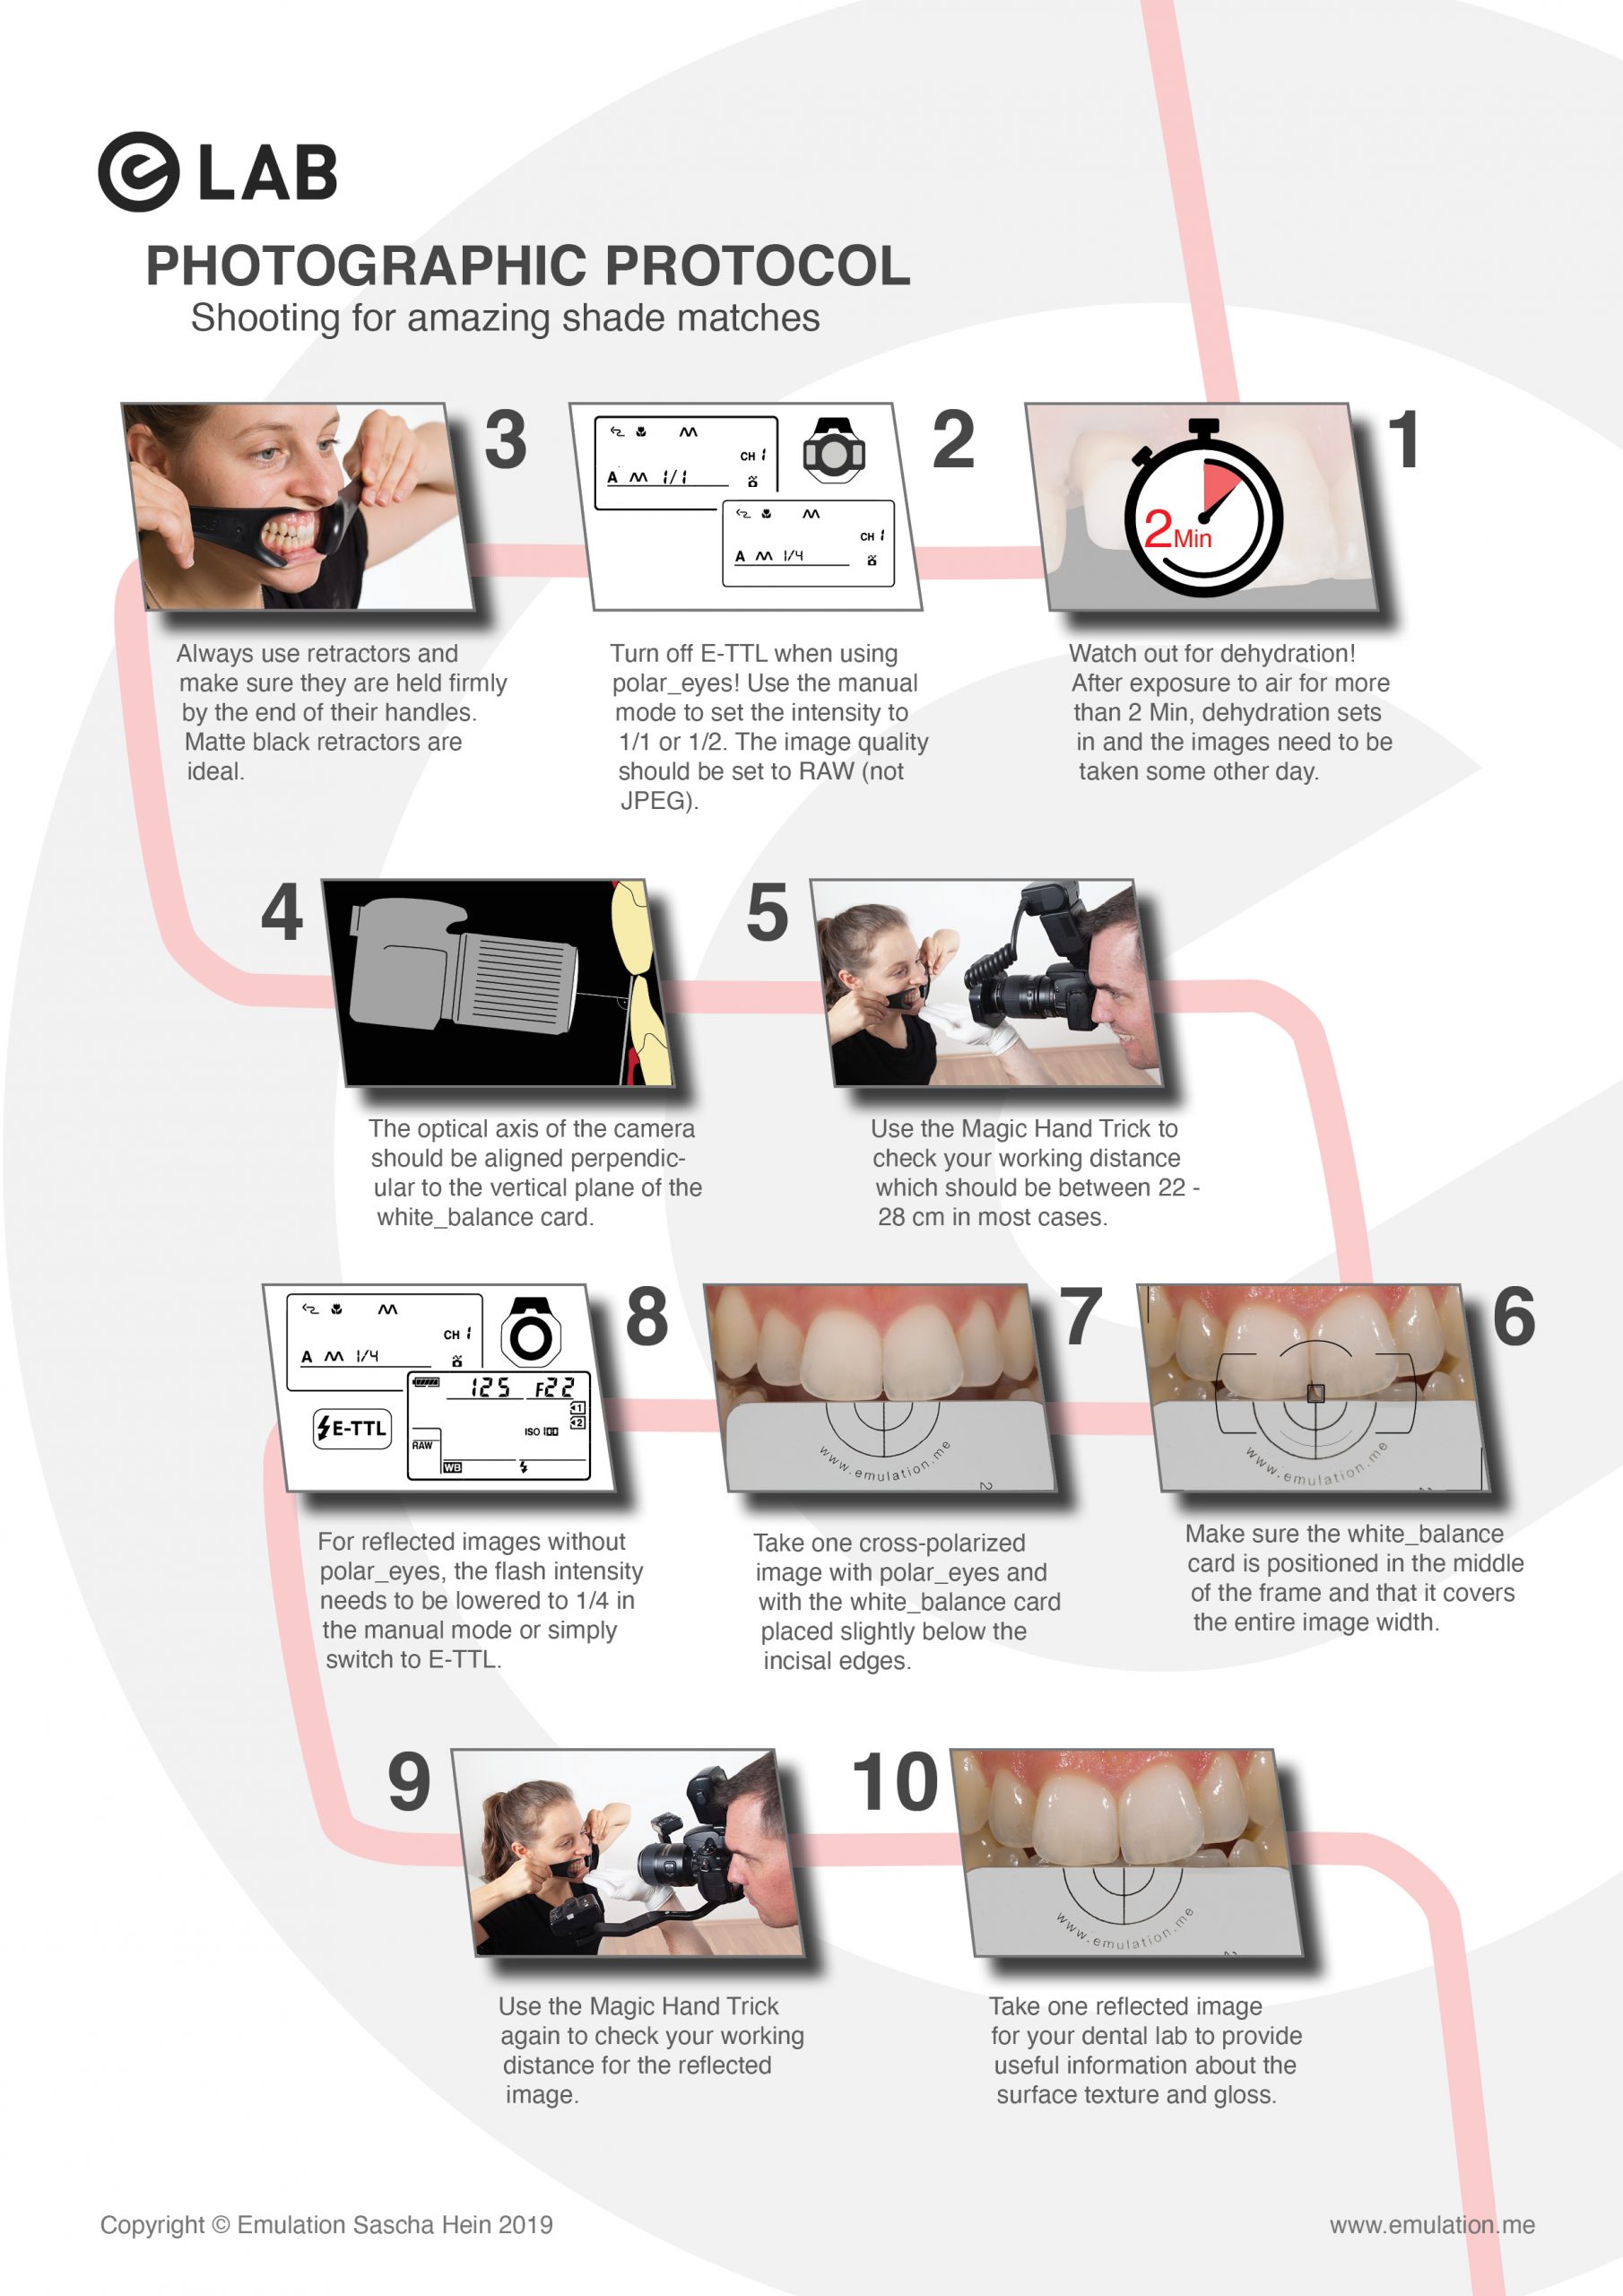
There is also a photographic protocol for eLAB:
I have no personal preference for any particular camera brand and I'm not being paid by anyone to express my opinion.
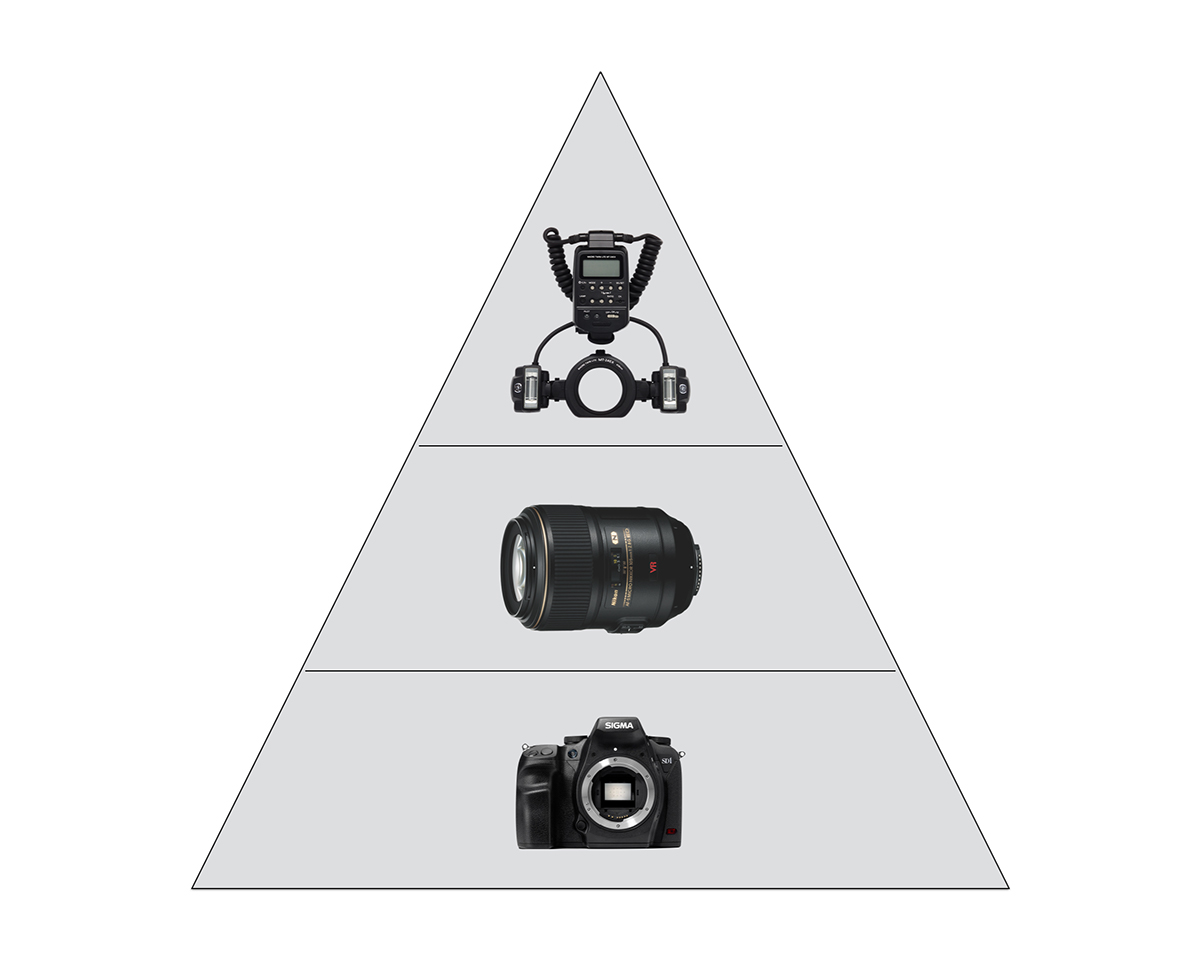
In general, any DSLR camera that fits in with your budget will work fine for eLAB. The possibilities are endless, but for what's available currently my advice would be:
Nikon D7500
- Nikon 85mm f/3.5 DX VR Macro
- Metz Mecablitz 15 MS-1 digital (or Sigma EM140ED if you can still get one)
Canon EOS90D
- Canon EF 100 mm F2.8 USM Macro (the old one made from metal not the new plastic one)
- Canon MR-14EX II Macro Ring Lite
Nerd Fact: When people need to buy their first photo gear for use in the dental surgery or dental lab, they usually have no clue and buy whatever the guy in the shop recommends. It so happens that often times people end up purchasing the Nikon AF-S VR Micro-Nikkor 105 mm 1:2, a fine but heavy and expensive lens. To me, the lesser known Nikon 85mm f/3.5 DX VR Macro does the job just as well at much lower price and weight. I see no issue with using third party gear like Sigma, Tamron or Tokina lenses but I also see no advantage either, other than a small amount of cost saving. If you intend to get some good use out of your camera gear, buy the proper stuff is my advice.
You may also wonder why I'm not recommending any lateral flash systems like Nikon R1C1, Canon MT24/26EX or the Meike MK-MT24S? Because I presume that you are a dental photography beginner. While a lateral flash offers more creative possibilities than a ring flash because of its flexible use, that same flexibility provides ample room for error if you are not 100% sure what you are doing. This is especially true when it comes to using the matching polar_eyes filter for your lateral flash and aligning it correctly.
This sort of debate can become quite heated pretty quickly and reach epic proportions. The main argument for mirrorless cameras is savings in weight and size because, well, they have no mirror...
Right.
I can see how that would weigh in if you plan to do a lot of video work with your camera, but for ordinary dental photography and for the purpose of eLAB, a mirrorless camera provides no particular advantage and the same is true for full-frame DSLR's.
All modern DSLR cameras are pretty awesome and do much the same. Save your money on a good quality flash followed by a good quality lens.
The eLAB system is centred around a rigid photography protocol that leaves little room for personal preference. Think of a photo spectrometer and its rigid geometry and set-up.
While the values for exposure time and aperture are fixed, the correct value for the ideal ISO is dependent on the exact camera model you use. Often times, this value is indeed around ISO 100 but for many modern camera models this value is more close to ~ISO 300 due to increased video capability.
Here is how you find out which ISO value is perfect for your camera, lens and flash combination:
Grab one of your coworkers who has nice teeth (the last bit is not essential but makes it more fun)
- Whack in a pair of retractors and pull them back and up towards the ears.
- Grab your camera and white_balance card.
- Make sure your settings are as shown above.
- Start taking the first picture at ISO 100 and then the next one with one ISO-interval higher and then the next one with one ISO interval higher and so forth.
- Repeat until you reach ISO 400.
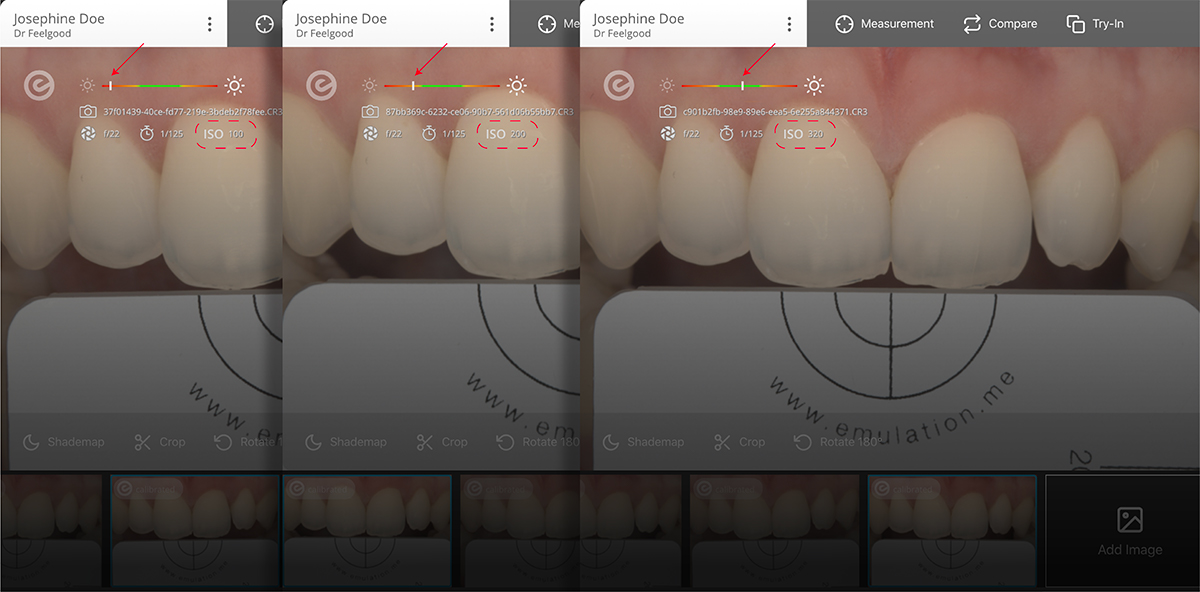
- Pop those images into eLAB_prime and hover your cursor over the e-symbol to check out the exposure bar to find out at which ISO the marker is right in the middle of the exposure bar and voilà: that is the ideal ISO value for your camera rig.
Picture above showing an exposure series starting at ISO 100 - 400. The ideal ISO for this particular camera and lens/flash combination is ISO 320 (Canon EOS 90D, EF 100mm f/2.8L Macro IS USM, Sigma EM140ED ring flash & polar_eyes).
- Mac: ~/Library/Application Support/elab/images/raw
- Windows: %AppData%/elab/images/raw
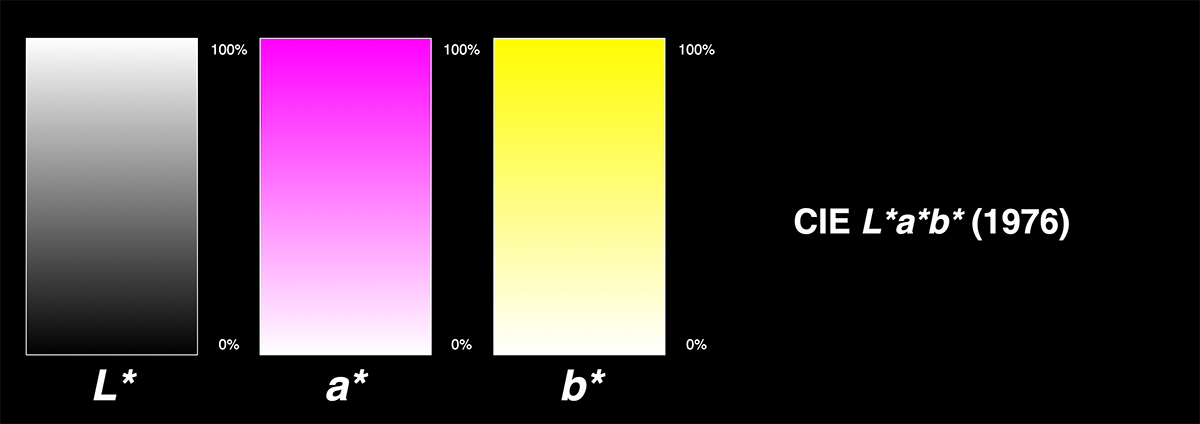
The CIELAB System is a color description model that was introduced by the Commission internationale de l'éclairage (CIE) which is a 100 year old organisation that creates international standards related to light and color. Moreover, with the L*a*b* system you can describe any tooth color using just for axises:
- L* = The amount of brightness a tooth color has from 0 - 100 %
- a* = The amount of red (or better magenta) a tooth color has from 0 - 100 %
- b* = The amount of yellow a tooth color has from 0 - 100 %
We believe that this should be the new standard for objective shade communication in dentistry. For a full description of its usefulness for dentistry you can watch this video here.
A brief description can also be found bellow;
Using just three axises, tooth color can be easily expressed, whereby L* is an expression for bright (luminosity), a for red (magenta) and b for yellow.
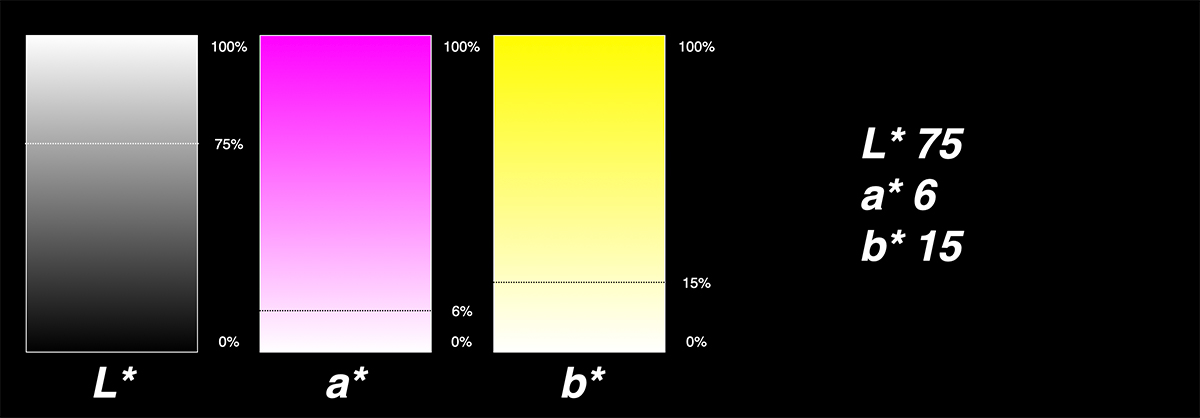
Suppose you wanted a common natural tooth color this way it would like this:
Although this appears unintuitive at first, since we are so much used to thinking in terms of "A1" or "B2", if you'd modulate (compute) these three color coordinates the resulting color would look like this:
By the way:
These three values express the average tooth color in 95% of all L*a*b*-values in our huge data base:
- L*µ=74.9028 (±0.286)
- a*µ=5.8426 (±0.114)
- b*µ=14.9754 (±0.251)
In comparison, the nearest standard shade would be (not surprisingly) an A2 from the current generation (ver. 2016) of the Vita Classical shade guide. If only it were that simple...
The color difference to the A2 is about ∆E*2.751 which just touches on the acceptability threshold (AT). More on what ∆E* refers to can be found under the next FAQ tab bellow.
Nerd fact: Since the beginning, different versions of the L, a, b system were floating around including Hunter L, a, b, Adams -Nickerson L, a, b and also the L', a', b' system. To keep track and to identify the different approaches, the CIE opted for the star-symbol * to be used for the CIELAB system. Today, it is pretty much the only LAB system left which didn't keep my professor from telling me off once for "liberally omitting" the star-symbol * in one of my essays on color science.
Simply speaking it means color difference. This is expressed through a single numerical value - the smaller it is, the better the color match!
If only it was that simple..
In general physics, the greek letter delta (∆) terms change. For instance "∆v" refers to a change in velocity (v). In the context of color science ∆E* refers to a change/difference in color between two objects under consideration. The letter E abbreviates he German word Empfindung meaning perception. Hence the E in ∆E*.
In its simplest form, the color difference ∆E* can be calculated using an adaptation of the Pythagoras Theorem to solve for the shortest metric distance between two color stimuli:
The equation above was put forward by the CIE in 1976 and is usually either referred to as CIE76 or ∆E with the subscript "ab".
To better reflect human visual perception, the ∆E* equation was refined a few times since its introduction, resulting in CIE1994 and finally in the CIE2000 version, which is commonly referred to as ∆E*oo, with the two zeros in subscript indicating that it is the equation from the year 2000:
This equation is markedly more complex than the old ∆E*ab version from 1976. It includes the weighting functions sl, sc and sh to compensate for lightness, chroma and hue differences as well as a hue-rotation component (RT) to deal with certain problematic regions such as blue region (H ~275°).
A lot of scientific research was conducted over the last 30 years trying to relate numeric color differences ∆E* to clinical reality. The premier authority in this field of research is Professor Rade Paravina from the Department of Restorative Dentistry and Prosthodontics at UTHealth in Texas.
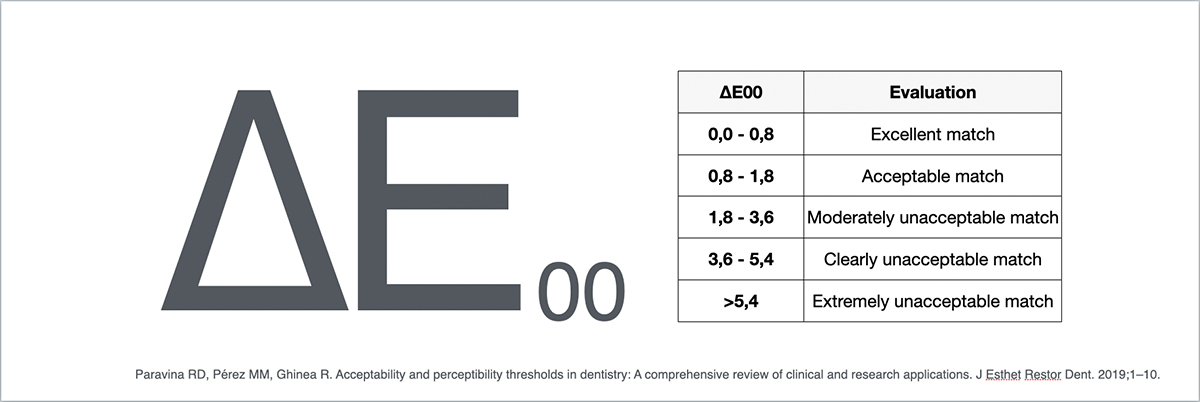
In 2019 he and his coworkers published a landmark paper outlining the clinical acceptability threshold for ∆E* using the CIE2000 equation:
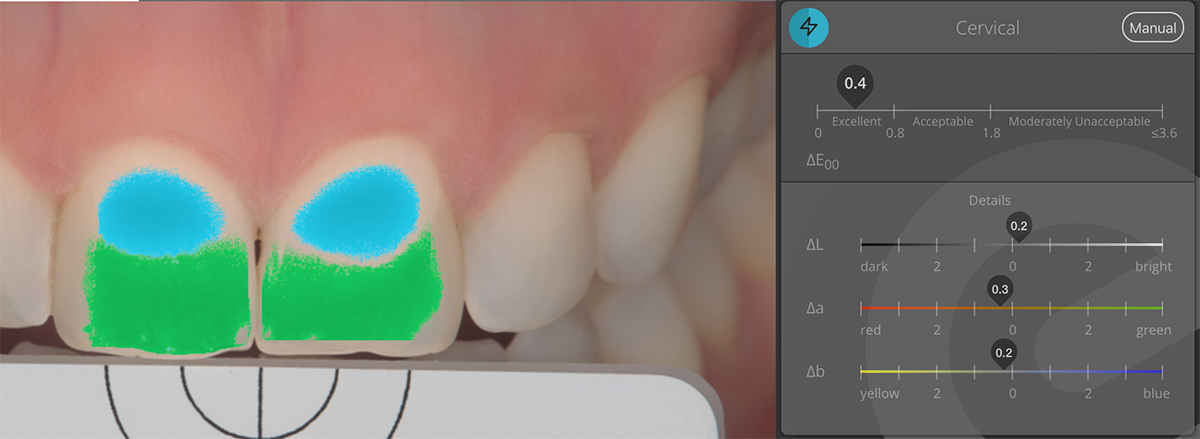
This approach is build into the eLAB_prime shade analysis module to help the user to decide when a crown can be send to a client and when it needs more work to improve the color difference to be within the limit of clinical acceptability (∆E*<1.8).
Nerd fact: Today there are much more advanced color appearance models, known as CIECAM02 (CIE Color Appearance Model 2000) which require heaps of entry arguments (10 to be precise) and also prior computation using CIECAT (CIE Chromatic Adaptation Transform). The main advantage of the CIECAM approach is that it considers the color of an object of interest in relation to its surroundings, that is, to its visual context. That would be the "full monty" so to speak, but thus far no one has managed to implement CIECAM00 in a meaningful way in dentistry.
The eLAB system is based on trichromatic subtractive color mixing using the nearest dentin ceramic shade to your target and with the addition of three stains, red, grey and yellow. The needed quantities are portioned with a set of instruments and mixed together. This video shows how it's done.
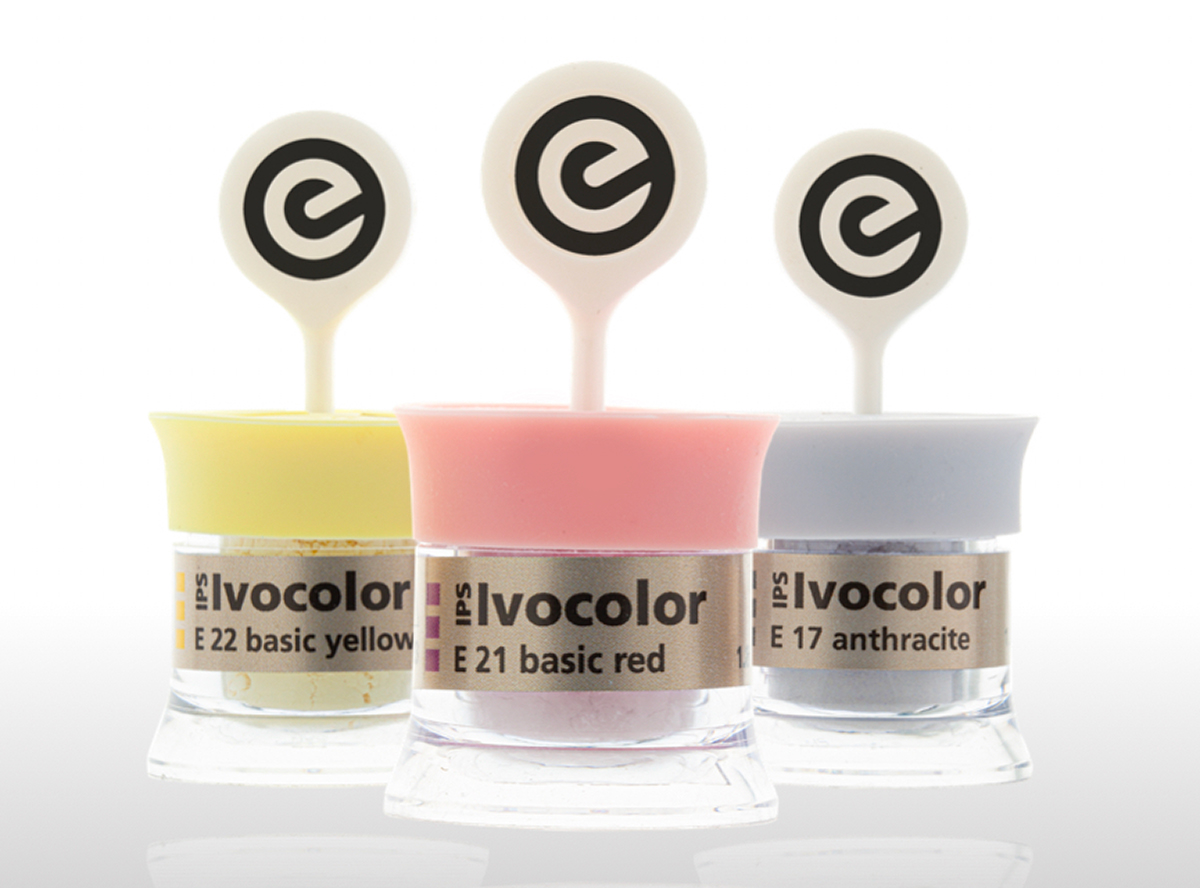
As mentioned above the mixing system behind the eLAB system are build around trichromatic subtractive color mixing. For a particular set of ceramic stains to qualify for this purpose, their absorption spectra needs to follow specific rules laid out by the color mixing laws (Billmeyer & Saltzman's Principles of Color Technology). The stains that currently satisfy these conditions best are the ones from the IPS Ivocolor Staining kit; E21 (basic red), E22 (basic yellow) and E17 (anthracite):
The short answer is no.
If only it was that simple...
Our intuitive perception will tell us that a bright bleach dentin has more opacity than, let's say, a dentin D2. As a matter of fact, this is untrue (at least for dental ceramics).
The reason for this surprising revelation is called absorption. Absorption is what gives an object its color.
When you change the color of a dentin by adding stains to it (i.e. by following the mixing recipe in eLAB_prime) you can only ever increase its absorption in order to reach the target shade. When you increase absorption you automatically increase the opacity as well, as photons are being absorbed thus affecting transmission (i.e. translucency/opacity).
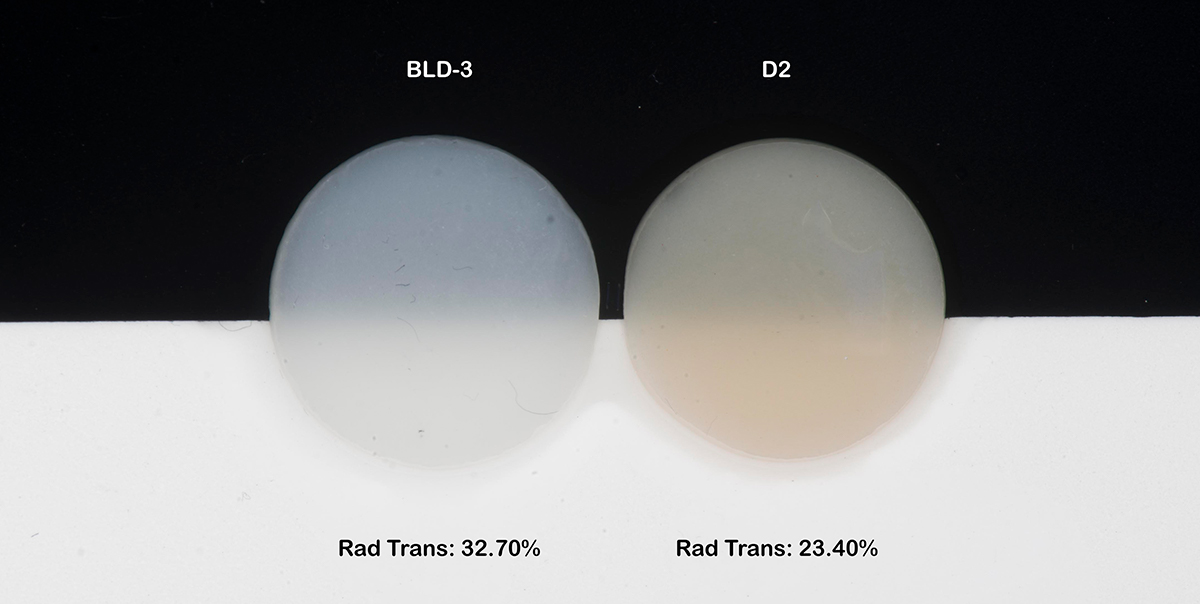
Bellow are two discs of LiSi BLD-3 and LiSi D2, both with the same thickness ( d=1.00 mm). There is nearly a 10% opacity difference, with BLD-3 having the lesser opacity between them both.
 Some people think (sadly, often former students of mine) that mixing ceramic powders with other ceramic powders is better than using stains because of opacity issues. This is most likely due to a lack of proper understanding and intuitive preference, but this perception is incorrect as the example bellow shows.
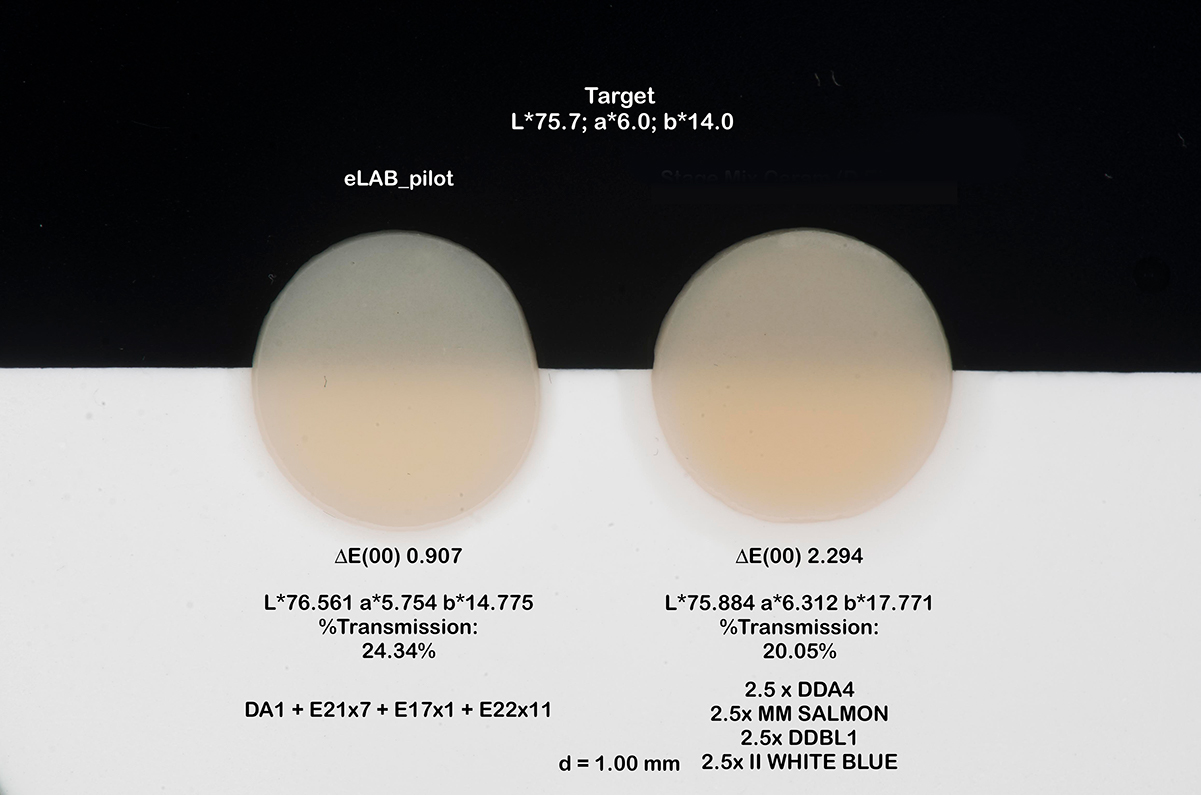 As the example above shows, the eLAB mixing recipe using stains resulted in the same color as the other sample but with about 4% more translucency.
But let's take this madness on step further. Suppose you mix a bleach dentin like LiSi BLD-3 with a nice "warm" cervical transpa-modifier like LiSi CT-25 and you make a disc. Then, let's get an eLAB mixing recipe to copy that and make another disc to compare them:
Even in this extreme example, you still end up with two samples which have the same color and much the same translucency.
Bellow is the transmission graph for both examples above:
 For a more detailed (and high-flying) definition check this out under Color Science.
Nerd Fact: The absorption-opacity conundrum generally holds up for dental ceramics but not necessarily for direct composites. Color can be achieved through absorption and also through scattering but only with tiny particles. The type of chemistry involved for direct composite is vastly different from glass ceramics, meaning that, such small particles cannot be used in dental ceramics or at least not easily. Also, manufacturers do have their ways to adjust the absorption and transmission of their glass ceramics to a certain extend. However, even for them, it is impossible to create a glass ceramic with any color (absorption) at any desired transmission (translucency/opacity).
The short answer is yes.
I often receive requests for collaboration from researchers from around the world regarding eLAB. However, I do not keep track of all of these activities, partially because not all personal research projects as part of the requirement to complete either an undergraduate or postgraduate degree make it into a peer reviewed journal and in case they do, this process usually takes time.
The last time I checked here I found some clinical studies that seem to revolve around the topic of eLAB.
The short answer is both are equally suitable.
I have briefly touched on this subject matter above already and will expand on this question a little further.
The flexibility–usability tradeoff is a design principle maintaining that, as the flexibility of a system increases, its usability decreases. The tradeoff exists because accommodating flexibility requires satisfying a larger set of requirements, which results in complexity and usability compromises.
As long as you pop the matching polar_eyes filter on your ring- or lateral flash, it doesn't matter which of the two you intend to use for eLAB. As easy as that may sound, it can be tricky if you use a lateral flash and if you are not 100% sure how it works (and/or if you are not into reading manuals).
This video here shows how it's done properly.
A ring flash on the other hand is a much easier to use device (less flexibility more usability). The matching polar_eyes filter has both, the polariser and the analyser sheet (which when crossed perpendicular to each other provide cross polarisation) build into a single metal frame, meaning, it's really hard to stuff up.
The short answer is you need polar_eyes to get images without surface glare.
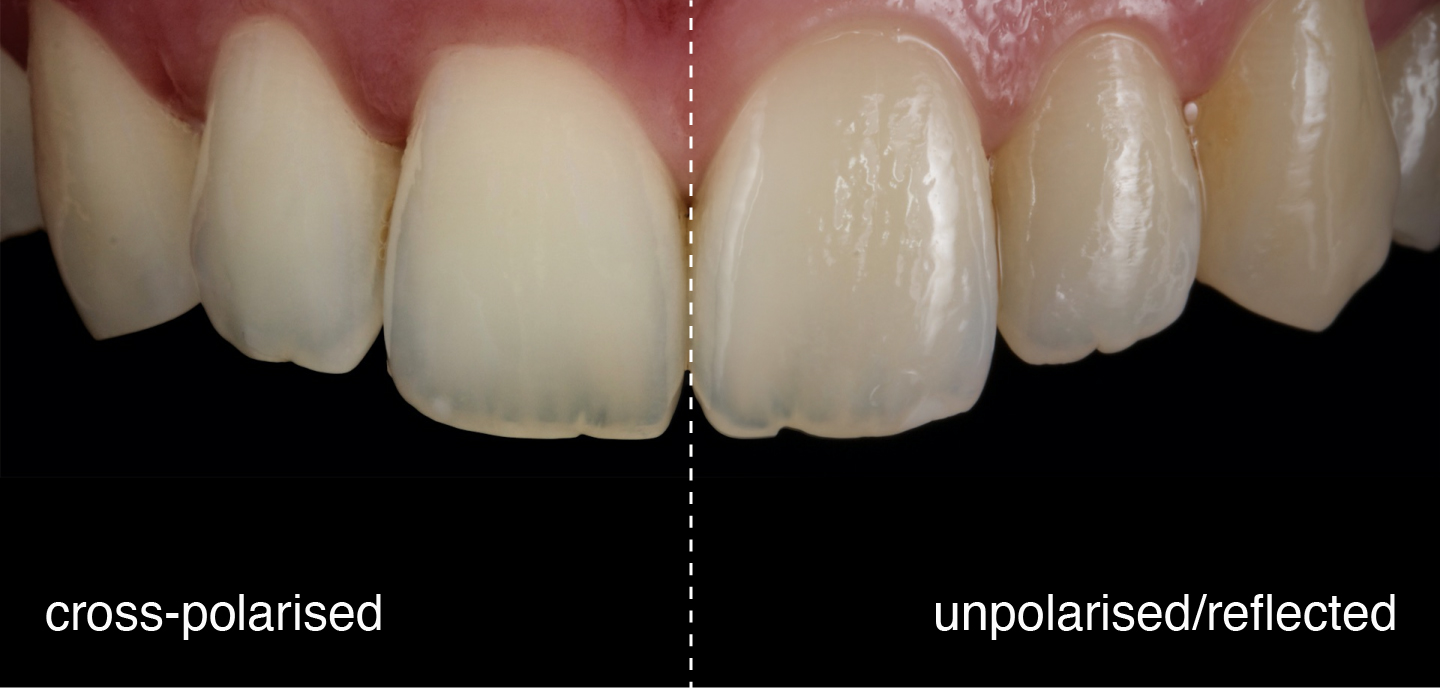
This prevents surface glare (specular reflection) from both the tooth surface as well as from the white_balance grey reference card, both of which aid in increasing accuracy.
This video explains the Ins and Outs and the practical application of polar_eyes, tips & tricks and what to watch out for.
Cross-polarisation
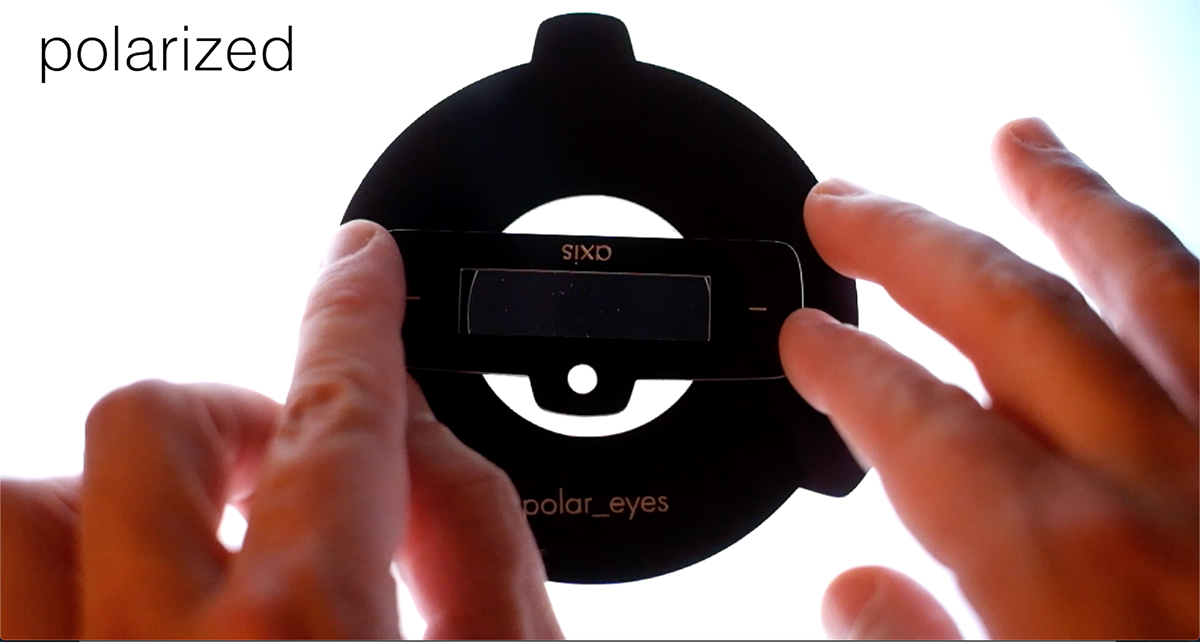
Cross-polarisation is achieved through two linear polarising sheets which are arranged in perpendicular (crossed) orientation to each other. When you trigger your flash, a beam of polarised light is being extracted from the burst of omnidirectional light emanating from the xenon bulb.
 Polarisation can be achieved in a couple of different ways but the most common approach is based on the polaroid method invented by Edwin Land in 1932 which uses dichroic polarisers thus achieving polarisation by absorption. The word absorption already provides a hint that electromagnetic energy is lost and in this context, it is worth explaining the concept of extinction ratio.
Extinction Ratio
Extinction Ratio relates to the effectiveness of a polariser which is measured by passing a beam of unpolarised light through two identical polarisers in series. If the two transmit along the same parallel axes, only one component is transmitted, and the output intensity is denoted as I1. If the two polarisers are now crossed, so that the transmitting axes are now perpendicular to each other, in an ideal world, no light would pass through at all, but in practice a small intensity I2 always does. The ratio of I1/I2 is what we call extinction ratio.
In a decent crystal polariser this value may be as high as 103 - 107 and this is precisely where a high quality polarising sheet differs from something cheap from Alibaba.
I have seen a few DIY-filters and copy-cat products that appeared decent, the majority however were pretty ordinary. A quick way to check this empirically is via the extinction rate. If you can still see a good amount of light passing through in cross polarised orientation, the extinction rate is obviously less than ideal.
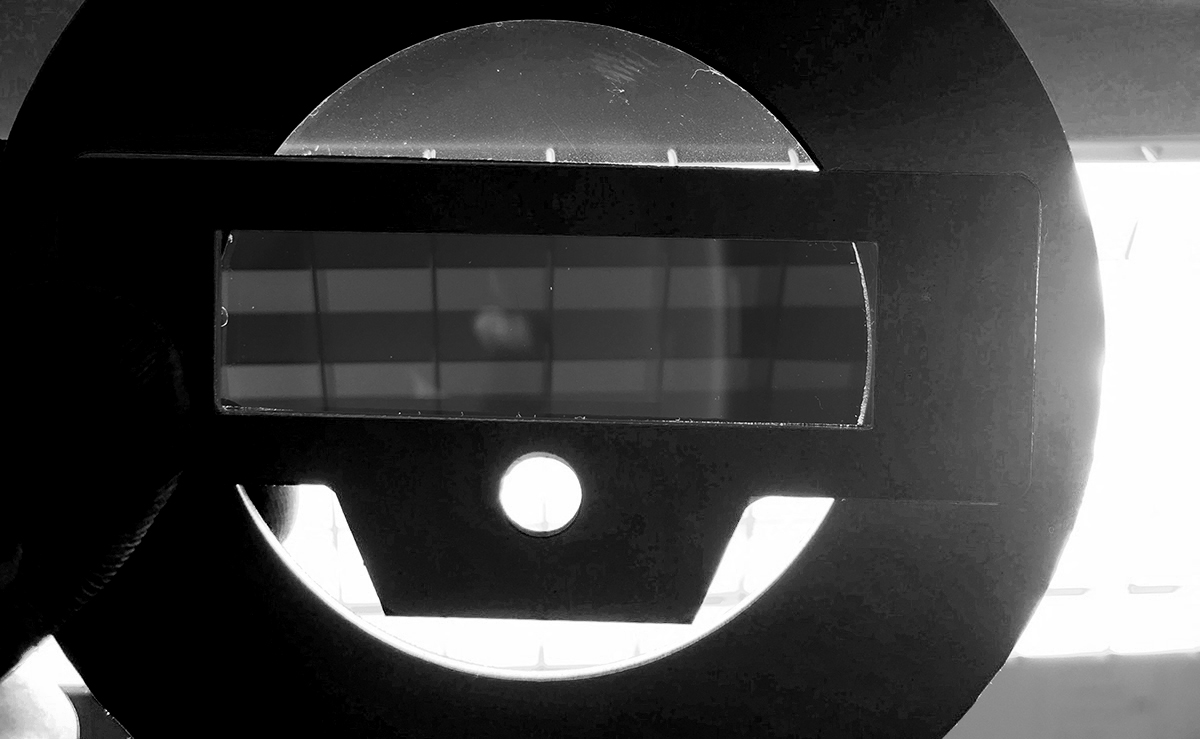 Solarisation
If the transmitted light takes on a brownish hue when the filters are in a crossed position, something is going on with the laminate of the polarising sheets, most likely the lack of adequate thickness. This usually results in a high rate of solarisation, leading to gradual transmission degradation. Think of it as an ageing effect which gradually occurs over the polarisers duty cycle. A modern electronic flash has a fair whack of power and due to the principle of polarisation by absorption, a good amount of the emitted energy is converted to heat (and other forms of energy) which gradually damages the polarising sheets, especially when they are too thin.
UV damage
Lastly, electronic flashes are usually equipped with a clear anti reflected coated poly carbonate plastic window, for the sole purpose to block the portion of UV-A radiation that is emitted from the xenon bulb when you trigger your flash. This approach has its origin in the old film days where the UV-A portion from the flash irradiation would be responsible for an unsightly, green color cast on the developed film. Today, lenses are adequately coated to block any UV radiation from entering the camera and there is also an internal UV-Cut Filter (hot mirror) mounted over the sensor of your DSLR camera for the same purpose. This has lead some manufacturers like Yongnuo to omit the AR-coated polycarbonate plastic lens on their lateral flash in favour of something else (most likely some sort of Acrylic) allowing UV-A transmission. Beware, because this will almost certainly have a detrimental effect on the solarisation of your polar_eyes filter.
The Lowdown
Cross-polarisation is vital for the use of the eLAB protocol to prevent surface reflections on the teeth as well as on the grey reference card. If your financial means are limited and you need to get started with eLAB somehow, something DIY will have to do (with no guarantee). As far as copy-cat products are concerned, people want to earn a buck by trying to catch a trend and cash-in on it, which is fine. This has little to do with the quality of a product though. Those few copies that I saw which didn't look too bad were nearly the same price as the original polar_eyes. Others looked like they were designed by fellas who have obviously underestimated the true complexity of the subject matter. Building a high quality and durable product requires considerable effort. My opinion is obviously biased, but my advice would be: if you can afford it, always buy the proper stuff and you will be on the safe side.
Super Nerd Fact: The first to mention the use of cross-polarisation in dentistry were Dr Philip Wander and Dr Peter Gordon from the United Kingdom in their still remarkable book "Dental Photography" published by the British Dental Journal (BDJ) in 1987 (!). Back then, Olympus offered a dedicated ring flash system (T10 ring flash) which optionally shipped with a cross-polarisation filter - a neat idea.
On page 10, one can find what might well be the first ever cross-polarised image of someones teeth (Plate 3b).
The authors looked into cross-polarisation and concluded that:
"Teeth without reflection look lifeless, and a loss of four stops reduces depth of field and makes focusing difficult"
And that was that.
From there on, cross-polarisation faded into obscurity until Lorenzo Vannini published "Light and color in anterior composite restorations. (Pract Periodontics Aesthet Dent. 1996 Sep;8(7):673-82). He was most likely the first to realise the full potential of cross-polarised dental photography presumably using the old Olympus equipment - we don't know what he actually used to achieve cross-polarisation because he made no mention of this in his article.
Dr Panaghiotis Bazos was the first to really popularise cross-polarised dental photography with the invention of polar_eyes. That lead to a bunch of adjacent developments including eLAB.
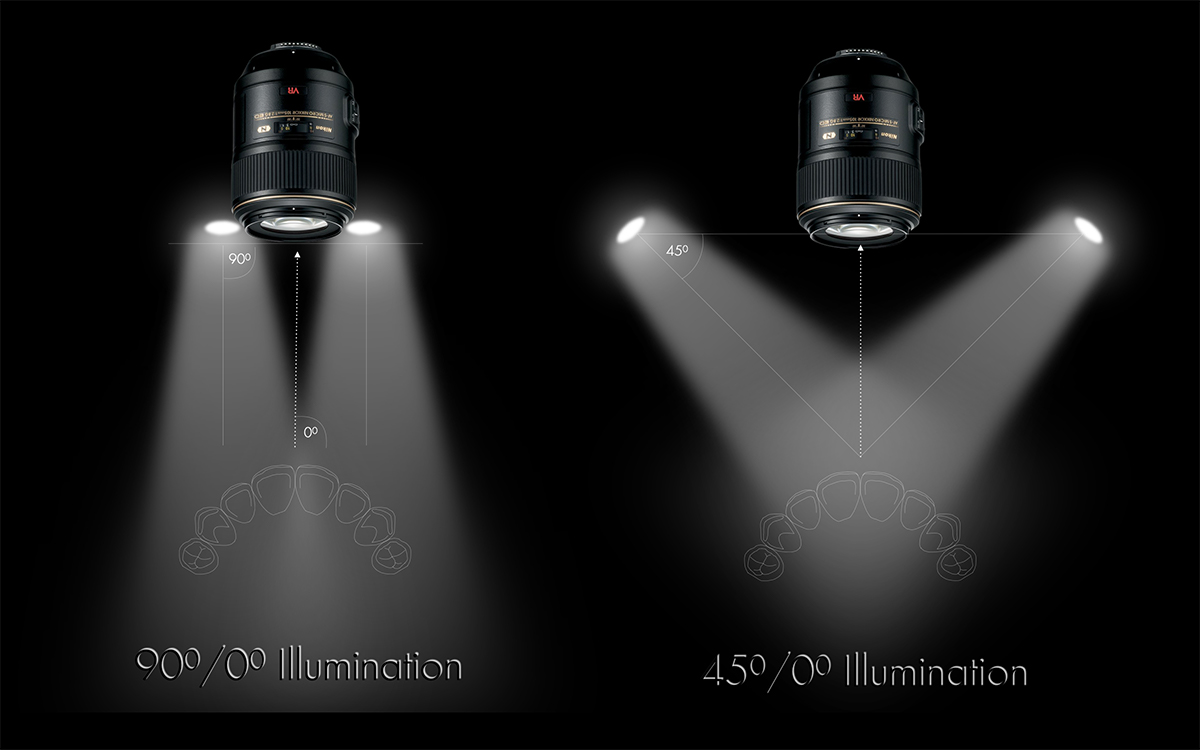
The main purpose of the axis bracket is to provide the ideal illumination geometry (45º/0º) in order to be able to photograph an object the way it would be normally perceivable for the average observer, that is, if you stood in front of the restoration in the patients mouth and you looked at it with your eyes.
Is it mandatory for the eLAB protocol?
The short answer is no.
As mentioned previously, once you pop on the polar_eyes, the illumination geometry doesn't matter. Hence, the main strength of the axis bracket is for reflected photography.
Background
45°/0° spectrophotometers are designed to mimic human sight and perceive color in the same way the eye does. Bidirectional instruments use two light sources which are placed on opposite sides of the sample and simultaneously illuminate the sample.
The 90º/0º geometry on the other hand is often used in cases where the gonioapparent properties (i.e. gloss) need to be taken into consideration as well.
Transferred to dental photography these concepts would look like this:
In clinical reality, the net observation looks something like this:
I have given a fair bit of dental photography courses around the world and I often observed what kind of gadgets participants would bring along to the courses. Often times these included heavy and clonky brackets with ample option for adjustment but nobody knew how and why they should be adjusted.
I wanted to design a bracket that would provide the only geometry that in my view makes sense (45º/0º), that is light and above all, easy to use.
The exact reasons leading to ordinary dental photography are already explained above. The most crucial element is to pay attention to your working distance but that's often easier said than done, especially when you are just about to start out with dental photography.
Here is why:
There is often confusion about camera lenses; what exactly they're supposed to do and how the actually work.
DSLR camera lenses are available in two flavours:
- Telephoto (Zoom) lenses
- Prime lenses
Both are designed to do two very different things:
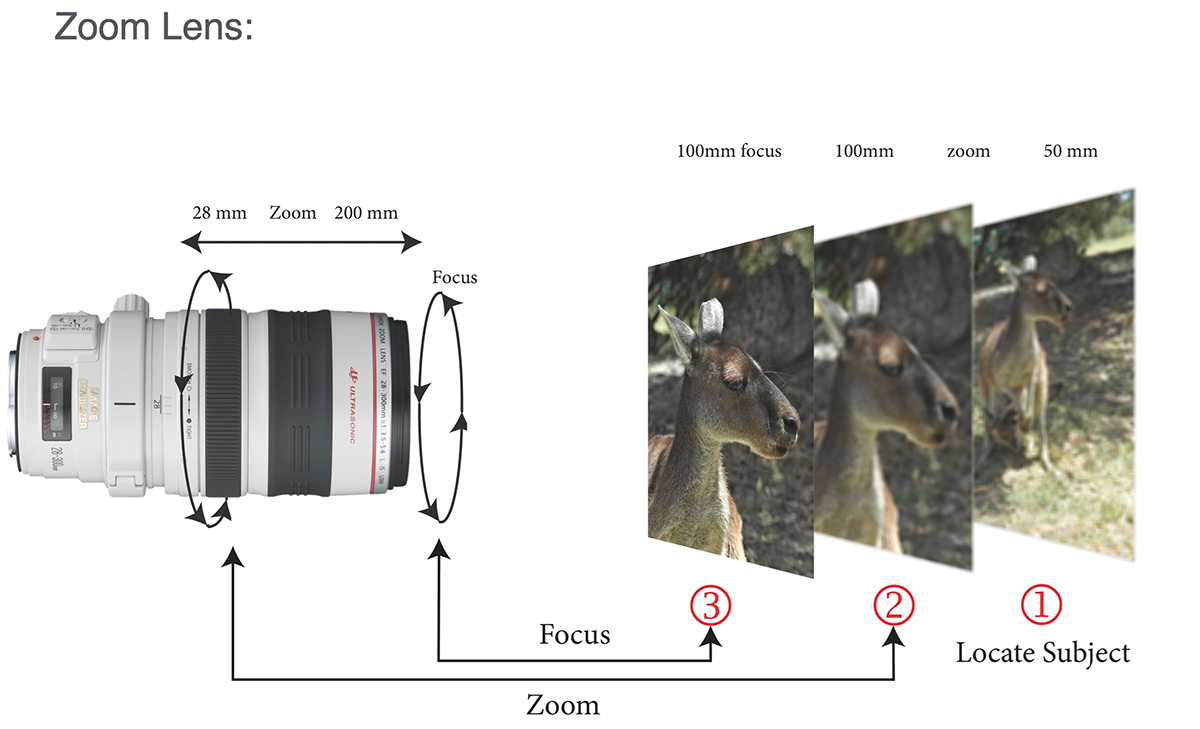
With a zoom lens (telephoto lens) you can pick your subject in the distance by rotating the barrel on the lens that is closest to the camera body, and this operation is usually referred to as "zooming". Once you have framed your subject the way you want it, all that's left to do is to focus - either by rotating the barrel that is furthest from the body or simply by using the autofocus function. And that's how it's done.
These zoom lenses are easy to operate but not commonly used in dental- or any other type of macro photography, and the reason is the reproduction ratio (often confused with magnification) which at best is (1:2) half life size. You couldn't photograph someones teeth with a zoom lens or at least no easily.
What is used for this type of application instead, are so called prime lenses.
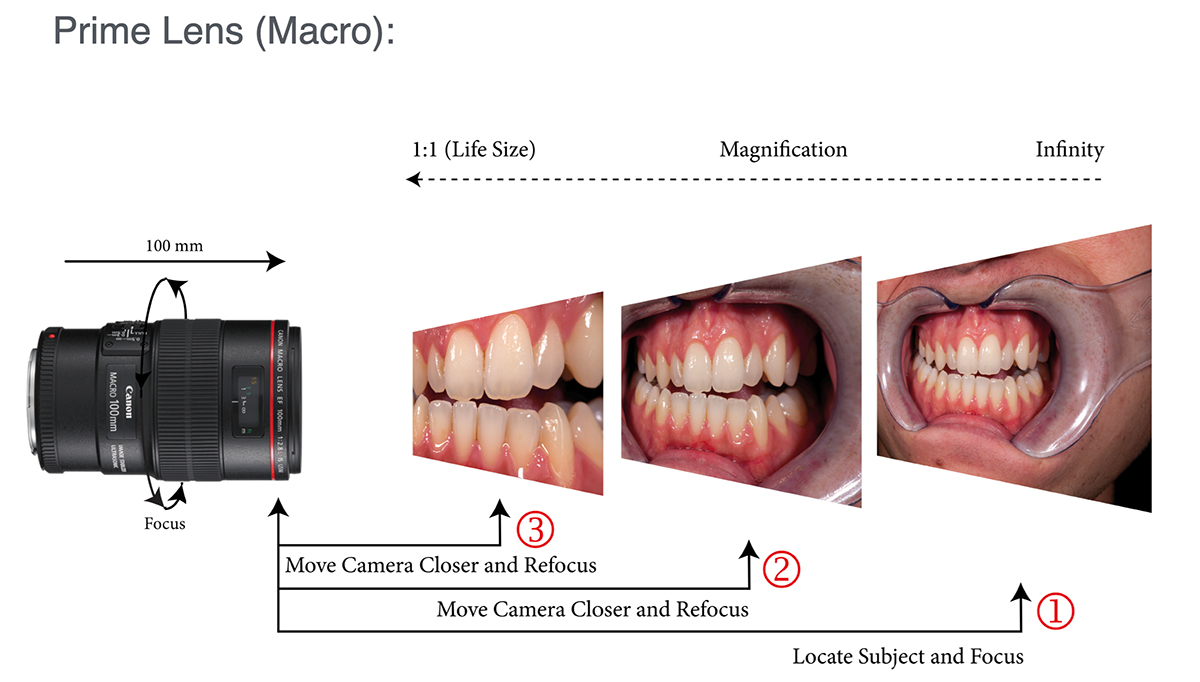
Where a zoom lens has a variable focal distance (i.e. 28 - 200 mm) a prime lens only has one discrete focal distance (i.e. 100 mm) and that is precisely what your macro lens has, too (i.e. 50, 60, 90, 100 or 105 mm) . Consequently, this means you cannot zoom with your macro lens - I know this may shock some of you but it is true.
Rotating the barrel on your macro lens followed by tipping the exposure button does one and same thing: focusing.
If you want to determine how big you want to capture your subject you will need to physically move your camera closer to your subject and then focus:
The distance from the lens to the labial surface of the teeth is commonly referred to as working distance and bellow is a chart for those of you who dig numeric values:
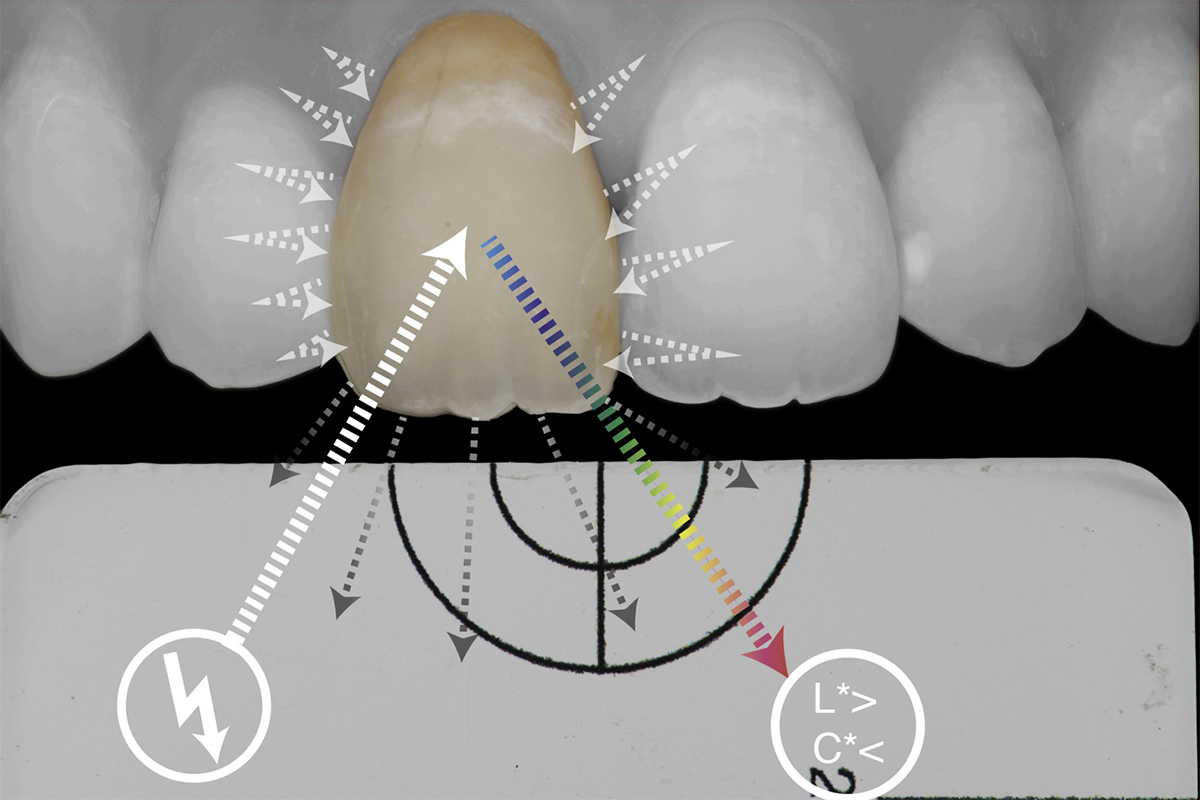
Natural teeth present as heavy light scatters and if attempted to measure their color with an instrument that has a small measurement window, a considerable fraction of the light entering the tooth is lost because it emerges at the surface outside of the window of measurement and is thus excluded from quantification. This phenomenon is known as edge loss and it presents a considerable obstacle when trying to quantify the color of diffusely scattering materials.
Imagine you photograph a tooth, or a crown with your camera flash. The light bursting from your flash will hit the labial surface roughly in a perpendicular angle (the normal). Some of the light will enter the tooth, scatter diffusely and return to the camera. A good portion of the light however will transmit through the crown (due to translucency) and exit the tooth/crown transversally and this light is hence lost along the edge.
When getting started with eLAB it may sound like in ingenious idea to just photograph your crown on its own, without a model:
On second thought however, this may not be such a great idea because, as this illustration demonstrates, a fair bit of light is being lost along the edges of the crown and that will be expressed in low reading for lightness (L*) and a higher than usual reading for the chroma (C*).
In order to prevent this from happening, what you should do instead, is to always photograph your crown on the simulation model - no matter what.
This way, some of the light that would otherwise escape along the edge bounces off the stone (plaster) and return back into the crown and then into the camera.
It is simply good practice to shoot your crown always on a model if you are serious about quantifying its color with eLAB.
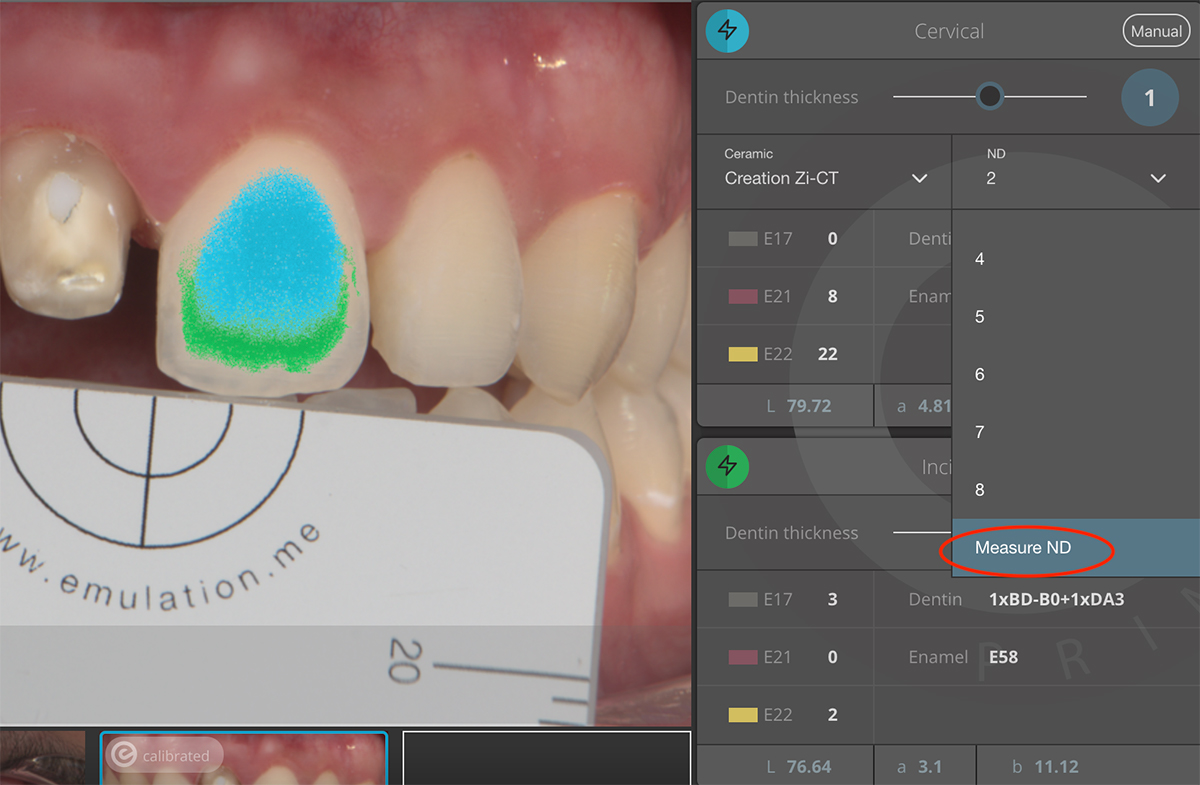
Simply pull open the image in eLAB_prime which contains the stump shade you would like measure (i.e. the preparation)
- Choose Measurement and then select the natural tooth next to the preparation you would like to measure
- Click on the ND drop down menu, scroll all the way to the bottom and choose Measure ND
- A new window will open
- Click on the preparation and draw an ellipse over the preparation you want to measure
- Under ND you will now see the L*a*b* values for the measured preparation
- Select the second image which contains the target shade you would like to measure (even if it is in a different patient file)
- Choose ND again and scroll all the way to the bottom and choose Measure ND
- A new window will open
- In the top right corner you can see the L*a*b* values for the last measured stump shade next to used last measured
- Click on it to select
- Voilá
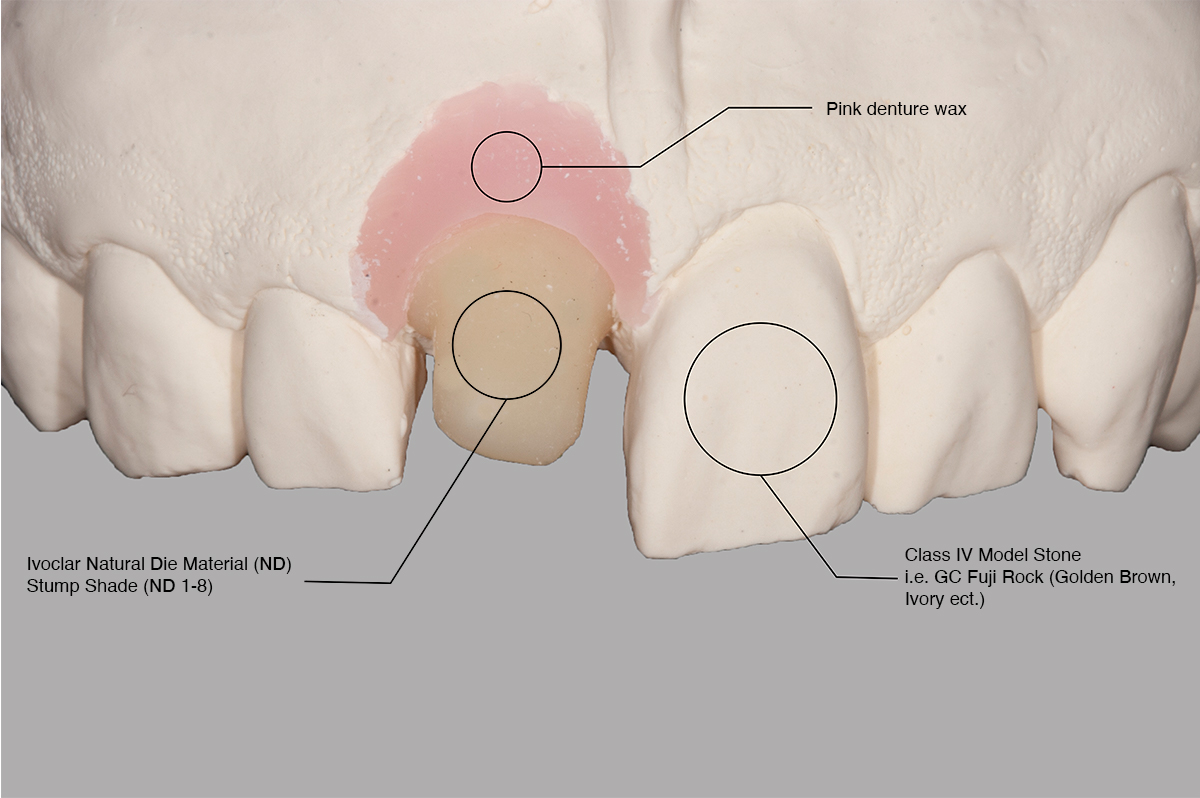
Anything with the expression ND in eLAB_prime refers to the IPS Ivoclar Natural Die Material Stump Shades .
So imagine you could use eLAB_prime for monolithic restorations. You would simply select the target shade and eLAB_prime would tell you which blank/pressable shades to use along with a mixing recipe for staining the restoration to perfection - BAM!
Sounds like a no-brainer, right?
If only it was that simple...
For the purpose of pure approximation this could be done I suppose, but not with reasonable accuracy for a number of reasons:
- It would be possible to formulate a dedicated staining recipe and portion it with the eLAB_copilot high precision portioning instruments but the moment you add staining liquid to it you will affect how much and what that staining mixture will do exactly once applied and also how often it is applied will have an effect on the result as well
- The exact color of the milled/pressed crown is volume-dependent, meaning there is a massive gradient from the cervical margins towards to incisial/occlusal aspect which makes it tricky to define which target value you should be looking for
- If you want accuracy you need to accurately copy the true stump shade in the mouth with your simulation model. The only half-reliable way of achieving this currently is with full color 3D printed models (yep - expensive)
But above all:
What makes monolithic restorations so seductive is simply quick money. For this reason, they are especially well suited for multiple restorations where, let's face it, custom shade matching doesn't really matter. Once you get into eLAB you will realise that it involves taking heaps of pictures, importing them into eLAB_prime and evaluating them. This sort of effort is well worth it for the single central shade match, to impress clients and to master the challenge but it is on the polar opposite to making money quickly.
Think about it...


